• Banner 1

Course Tour

coursemap

  • Hole #1

    Hole #1

    The starting hole will provide some of the best views of the Texas Hill Country. This downhill, sweeping right to left par 4 has two landing levels and is flanked by mounds on the right. The second shot is to an extremely low-profile green guarded on the right by a large bunker. The valley effect is prevelent on what seems to be a simple green. Do not be fooled, as there is more slope than you may think.

    Hole #1

  • Hole #2

    Hole #2

    Ranked the most difficult hole on the golf course. A generous sloping fairway waits for your longest drive. Only the longest hitters bring the bunker on the right into play. The second shot crosses over a small creek to an elevated green with plenty of room to the right. Avoid a short second shot left, as a grove of oaks and a cavernous bunker loom here.

    Hole #2

  • Hole #3

    Hole #3

    Majestic views adorn the course's first Par 5 where an accurate drive is paramount. Only the strongest players can reach the green in two. Stay to the left of the huge bunker on the right with your second shot and avoid the trough bunker short and left of the green. Beware of the tiny green's false front, as it will return your ball to the fairway should you land too short with your shot to the green.

    Hole #3

  • Hole #4

    Hole #4

    The opening nine's first par 3 is the shortest on the course. The green is smaller than it appears and is protected by oaks on the right and a large bunker on the left. Hitting long and right will result in an awkward shot to the green. One of the most difficult greens on the course to read, it will bring a true test of your putting skill. Any breeze will make club selection extremely important.

    Hole #4

  • Hole #5

    Hole #5

    A strong uphill drive is required to this fairway protected by a bunker on the left. Whoever challenges the bunker side of the fairway will be rewarded with the best approach angle. Your second shot requires accuracy, as a deep bunker guards the green on the right. A left to right ball flight is an advantage on the approach to this green. Among the most difficult par 4's on the course, this hole will test all of your skills.

    Hole #5

  • Hole #6

    Hole #6

    The narrow fairway on this downhill par 4 is framed by trees along the roadway and a drivable bunker on the right. The fairway slopes right to left adding distance to most tee shots. The small green is open in front and protected on the right by a bunker. The left side slopes away from the green.

    Hole #6

  • Hole #7

    Hole #7

    Falconhead's shortest par 4 is a risk/reward hole. A strong, accurate drive can reach the green, but it's best to avoid the bunkers surrounding the front and left side of the green. Playing to the fairway leaves a short approach shot to the undulating green and an excellent birdie opportunity.

    Hole #7

  • Hole #8

    Hole #8

    Falconhead's Signature Hole may be one of the most unique you will ever play. The green is built on a limestone ledge which cantilevers as much as 30 feet above Friday Creek. Enjoy the stunning beauty of this matchless hole, which features three cascading waterfalls and two ponds. Only properly struck shots will hit and hold this large green perched above the water. Hitting this green on your first try will make your day.

    Hole #8

  • Hole #9

    Hole #9

    This left to right par 5 is uphill. A large landing area gives long hitters the opportunity to hit their uphill second shot to the green with a well-placed effort. The green is somewhat blind from your approach and slopes away from you, making knowledge of the pin position critical. Mounds surrounding the green make recovery shots tough.

    Hole #9

  • Hole #10

    Hole #10

    What a beautiful view to start the homeward nine. The tee shot is played downhill to a ridge. Long hitters who carry the bunker on the left will get extra roll. Proper club selection is a must on the downhill approach shot. The long, narrow green is protected by a bunker on the front right and enclosed by the hillside on the left.

    Hole #10

  • Hole #11

    Hole #11

    This par 3 plays downhill to a green with subtle contours. Don't let the visuals deceive you on this hole. The bunker is well short of the green and shots hit long result in a difficult pitch up the hill. Be sure to trust the yardage and adjust for the downhill shot. Any breeze will affect high shots above the trees.

    Hole #11

  • Hole #12

    Hole #12

    This uphill par 5 provides a generous landing area, best played on the right side. The second shot affords you a choice: laying up short of the cross bunker on the right, challenging the cross bunker by playing left, or playing to a shelf above the bunker in an effort to reach the green.

    Hole #12

  • Hole #13

    Hole #13

    A beautiful panorama awaits the player on this daring par 4. A strong tee shot is required that avoids the fairway bunker left and a stately oak tree on the right side of the fairway. The uphill approach shot is to a slippery, two-level green which slopes from left to right. A very deep bunker guards the right side of this green, surrounded by several generous chipping areas.

    Hole #13

  • Hole #14

    Hole #14

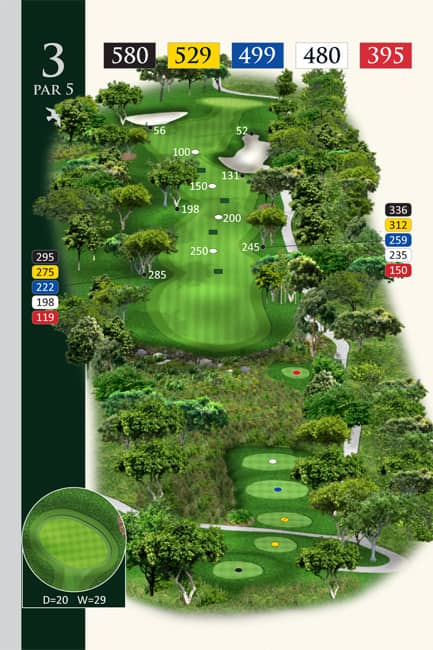
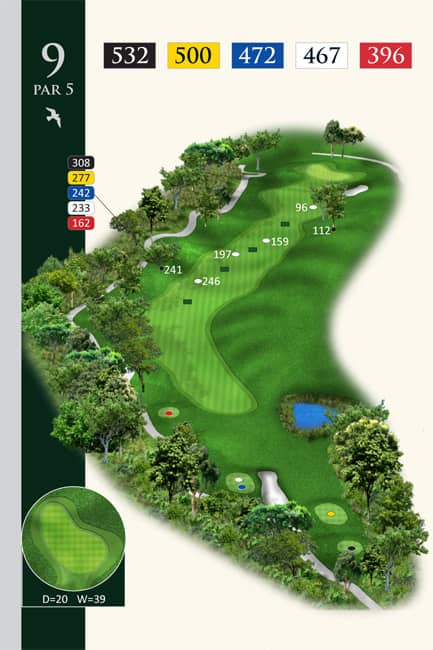
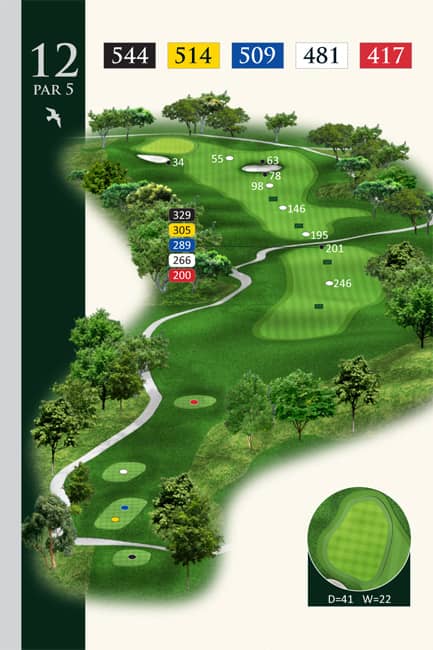
    On this par 5, strong players will need to challenge the trough bunker on the right and hit into a narrow fairway area to the left, if they wish to go at this green in two. For the average player, a drive down the right side of the generous landing area offers the best position to play the hole. The green is guarded by another trough bunker to the right and massive oak trees left, making a relatively straight forward hole a real test.

    Hole #14

  • Hole #15

    Hole #15

    This strong hole plays downhill to a narrow landing area sloping right to left. After a demanding drive, the player is faced with a second shot that must negotiate around a pond to the left and a difficult bunker on the right. Players finding themselves in the bunker will need to demonstrate a skillful touch as the green slopes hard away from the bunker.

    Hole #15

  • Hole #16

    Hole #16

    The longest and last par 3 on the course is played from a chute of trees to a green guarded on the right by a steep slope that feeds balls into a trough bunker. Allow for any breeze in your club selection. The large green is a challenge, sloping from back to front with subtle breaks that will challenge the best of putters.

    Hole #16

  • Hole #17

    Hole #17

    This short, downhill par 4 has an ample landing area to receive your tee shot. The short second shot plays to a long, narrow green with a distinct valley in the middle. This green puts a premium on both distance and directional control for all players. Miss the green left and you are facing a speedy and delicate recovery. Miss right and the ball will either find the bunker or run away from the green quickly.

    Hole #17

  • Hole #18

    Hole #18

    This finishing hole may be the most demanding hole on the course. Your most accurate drive will be required here. The fairway slopes left to right and only the strongest hitters will bring the left side bunker into play. The uphill second shot is to a green that slopes right to left and is guarded by a large bunker on the left. A par on this difficult hole will leave you with lasting memories of accomplishment.

    Hole #18

Close